
Minecraft offers a wide range of tools and crafting stations that allow players to express their creativity, and one of the most underrated yet useful blocks for decoration is the loom. This block is primarily used to design and customize banners, making it a fun way to personalize your builds, bases, or even flags for teams and kingdoms. If you’re just getting into banner design or want to add a loom to your survival base, this guide will walk you through everything you need to know about how to make and use a loom in Minecraft.
What Is a Loom?
A loom is a utility block that allows players to apply patterns and colors to banners using a much simpler and more user-friendly interface than the crafting table. Before the loom was introduced, players had to remember complicated recipes using dyes and banners in crafting grids. Now, the loom handles all of that through a clean interface where you can easily preview and apply designs.
The loom isn’t just a cosmetic crafting station either. It also plays a role in village mechanics. When placed near an unemployed villager, it can assign the shepherd profession, allowing for access to new trades involving wool and dyes.
Materials Required to Craft a Loom
To craft a loom in Download Minecraft, you only need two basic materials: two wooden planks and two pieces of string. Wooden planks can be obtained from any type of wood — oak, spruce, birch, jungle, acacia, or dark oak — so you don’t need to worry about matching types. String is typically dropped by spiders when defeated, but it can also be found in dungeon chests or by breaking cobwebs with a sword.
Crafting the Loom
Once you’ve gathered the materials, head to your crafting table. Open the 3×3 crafting grid and place the items in the correct formation. The two pieces of string go in the top row, while the two wooden planks go directly beneath them in the middle row. This pattern will result in one loom block appearing in the result box. Drag it into your inventory, and you’re ready to go.
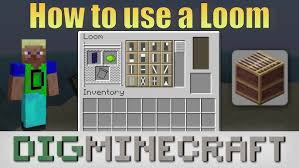
How to Use the Loom?
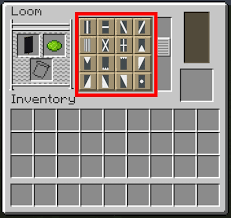
After crafting your loom, place it anywhere in your world just like any other block. Right-click or press the interaction button to open the Loom interface. You’ll see three input slots: one for a banner, one for dye, and an optional third slot for a banner pattern item. The third slot is used if you want to apply special designs like a creeper face, skull, flower, or Mojang logo.
Insert a banner into the first slot, add dye to the second slot, and then choose from a list of preset designs that appear. You’ll get a live preview of what your banner will look like, making it easy to experiment with color combinations and patterns. Once you’re happy with the design, take the finished banner from the output slot.
Where to Find Looms in the World?
If you don’t want to craft a loom yourself, you might be able to find one naturally generated in villages. Shepherd houses often contain a loom, and you can break and take it using any tool, although an axe breaks it the fastest. Once collected, you can place it wherever you want.
Why You Should Use a Loom?
The loom is not just about making cool-looking banners — it’s about simplifying banner customization. You no longer have to remember specific banner and dye combinations or waste resources experimenting with the crafting table. The loom gives you full control and lets you preview your work before committing to a design. It also opens up possibilities for creative expression, especially in multiplayer servers or themed builds.
Final Thoughts
Crafting and using a loom in Minecraft is easy, inexpensive, and incredibly useful for anyone who loves customization. Whether you’re designing banners to represent your survival base, decorating your medieval castle, or just experimenting with patterns, the loom is a must-have tool. Now that you know how to make one and how it works, go ahead and start bringing your banner ideas to life.